|
Student voting takes interactive lessons to a whole new level! This is a fantastic assessment for learning tool. Plenaries could be made more effective than your typical thumbs up or thumbs down by providing students with the opportunity to vote! Each student can be given a handheld voting device with different numbers or letters - as an example Activote works with Prometheon software. The advantage to voting means that children cannot see how other children are answering questions and therefore it is likely the outcome will be more truthfully representative of the students understanding. I often used “Who Wants to be a Millionaire” style plenaries at the end of lessons and Activote would allow me to fully take advantage of the game format through the “ask the audience” option!  http://australiancurriculumtfel.edublogs.org/2014/07/30/promethean-iwb-activote-and-socrative-student-response-systems/
0 Comments
Makey Makey is described by its creators as a simple invention kit that turns everyday objects into touchpads and combines them with the internet. It works by using crocodile clips and making connections and can turn anything into an input device for a computer i.e. turns anything into a keyboard! I have not yet had the experience of using a makeymakey however, after watching videos demonstrating the exciting things you can create I certainly feel very inspired with ideas of how I could use it in my lessons. Below is a video from the creators of Makey Makey demonstrating some of the things that it can be used for! The Makey Makey provides a great opportunity to link Computing with Design Technology. For example, you could ask your students to create a gaming controller. This project could span a long period of time with children designing and redrafting their ideas before making a prototype and then finally combining with a Makey Makey to make a real, functional controller.
In addition, it provides a fantastic link the the Year 4 Science Curriculum in which students study circuits. The Makey Makey requires open and closed circuits to work and so students can combine their scientific knowledge to designing a Makey Makey that works. A little bit more exciting than lighting up a miniature light bulb!! In the next google hangout with our PGCE Computing Lead, Jon, I learnt all about teaching computer networks in KS2. This is when the curriculum introduces computer networks. National Curriculum (2013): KS2 Aims for Computing: “Understand computer networks including the internet, how they can provide multiple services, such as the world wide web and the opportunities they offer for communication and collaboration. Use search technologies effectively appreciate how results are selected and ranked and be discerning about evaluating digital content” Communication and collaboration include things such a blogging, email, twitter and Wikipedia etc. ICT is using the search engines effectively, but now understanding how search engines work i.e. how results are ranked reflects how ICT has shifted to computing and understanding the mechanisms behind the user interface. The image below taken from the Google Hangout is a representation of the internet – a map of all of the connections and devices that make up the internet. Pupils often guess the image is of a birds-eye view of a city or the neurons in the brain, which in a way is on the right lines as the map shows connectivity. 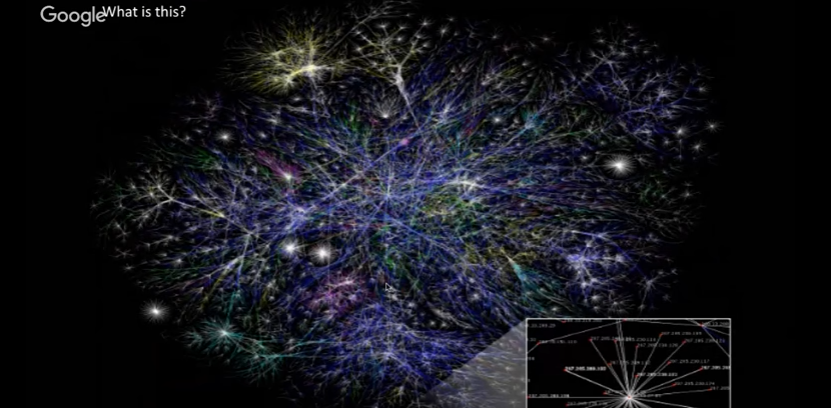 Submarine Cable Map This website shows the internet cables and each line on the map shows the distance the cable travels and who it is owned by. This is a great way to demonstrate to students the internet physically connects different countries. Cross-Curricular Opportunity? Perhaps you could couple this to a geography lesson, looking at which countries are connected by cables and the dates at which the cables were introduced. Additionally, you could use the Submarine Cable Map in mathematics, comparing cable sizes between different countries and working out proportions of one cable compared to others. http://www.submarinecablemap.com/ 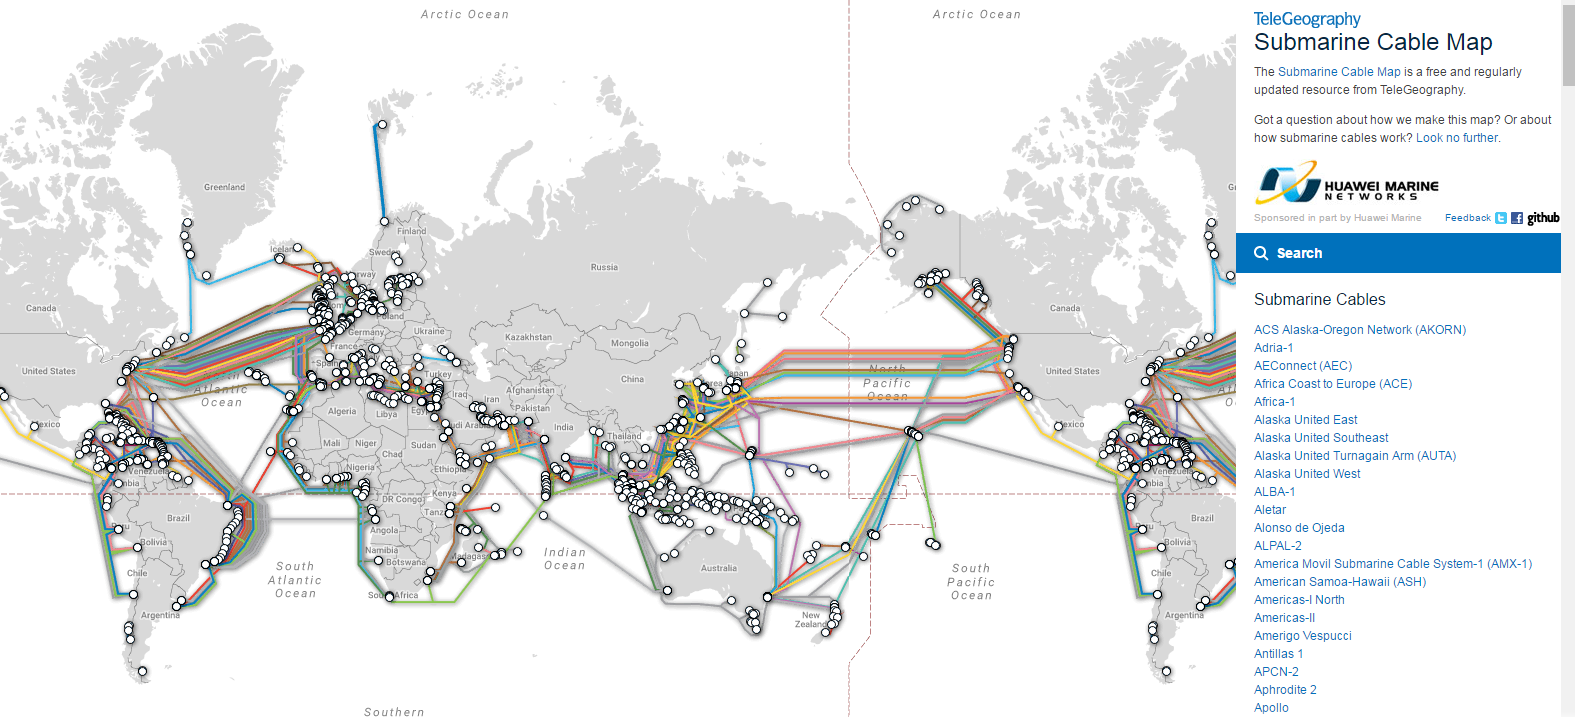
BA key learning point to teach students, is that the internet is different to the world wide web! A common misconception is that they are both the same thing. The WWW was developed by Sir Tim Berners-Lee who wanted to allow scientists at CERN, where he worked, to share data amongst themselves through a network. He invented the rules behind how we share information today. WWW is information storing system and the internet is the hardware. Teaching Activity: A Human Model of the Internet – Barefoot Barefoot resources provides a fantastic human model activities which allows students to understand what happens when they access the internet through a client computer (e.g. computer or a laptop). When we access the internet we use a client computer, e.g. phones, laptops. The provide a very informative pdf which outlines the different components that make up a network and some ideas on how to teach it: Barefoot Computer Networks Concept Pdf Traceroute: When we access a website data packets travel along different routes to get tothe target computer. Traceroute provides a visual representation of the IP-Routers the data packets or “message” travels.. This allows you to visualise how the www is accessed through the internet and where the servers for each site are stored. However students must be cautioned that the result can be influence by firewalls and other things so the result plotted may not always be accurate! Below is an example using Google: When searching for Google – the message travels to Germany and then across to San Francisco where the servers are stored for Google. 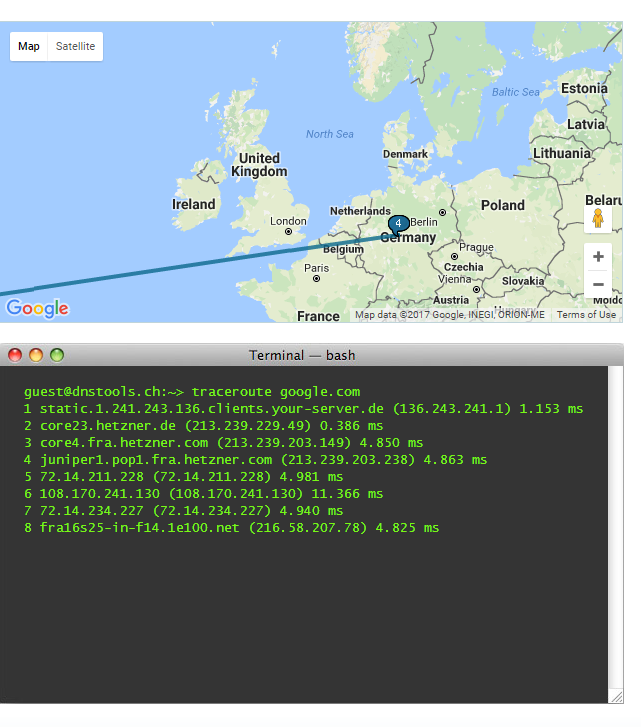  Teaching about Networks One idea Jon presented was a 'Network Safari'- you provide children with a set of pictures such as the ones below and they go on a safari hunt marking down where they find each of the below hardware in their local area. They could potentially plot this on a map so they use geography field skills (or even coordinates for mathematics!) and can visualise what a local network looks like and how it is connected. It is important that students think about why each thing is important, and ask what are they connected to? This provides an opportunity to talk about the concepts behind computer networks and how you can do very little in a school without a server! This is a fantastic idea, however, you must be careful to ask the school office permission before sending down a flock of students to scout out printers and phones! Teaching about Internet Usage To illustrate the volume of people using the internet any instant the website “Internet Live Stats” is a fantastic for showing a visual representation of internet usage. The site shows ever-increasing live figures for how many people are using different outlets of the internet. It has a live feed of numerous different types of data from tweets posted, to number of websites hacked to amount of Carbon Dioxide produced as a product of internet use! 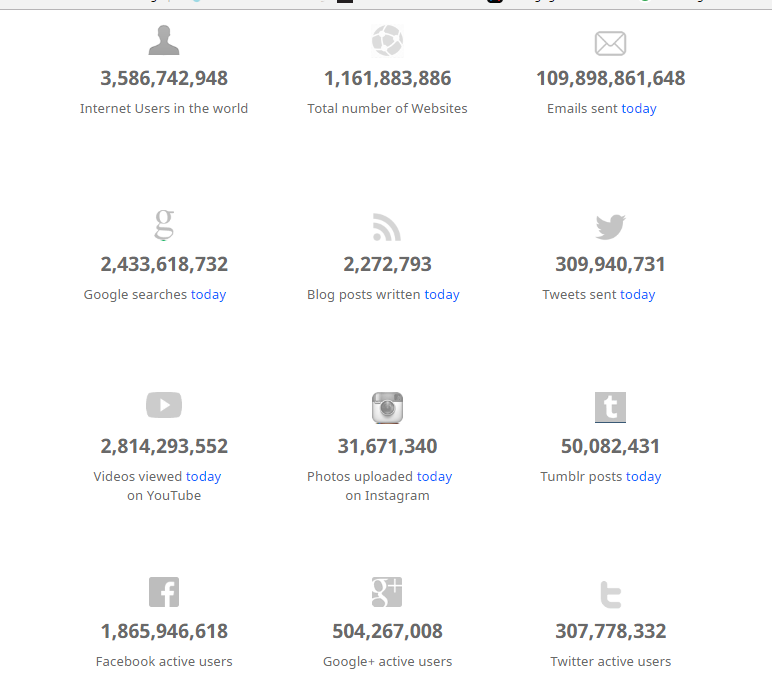 http://www.internetlivestats.com/ This provides a great opportunity to show student just how many people are using the internet at any one time. The figures for each statistic increase at varying rates. For example number of websites created vs number of tweets posted – this could lead to discussions on why they think the numbers increase at different rates. In addition you could link in science or PSHE – were students aware that use of the internet affects carbon dioxide emissions? Do they think that the carbon dioxide emissions from the internet are more or less than from other industries? How can they find out? It also shows you pictoral representations of number of emails/tweets/skype calls/tumblr posts etc sent per second, which provides a great way to compare the different types of internet usage. 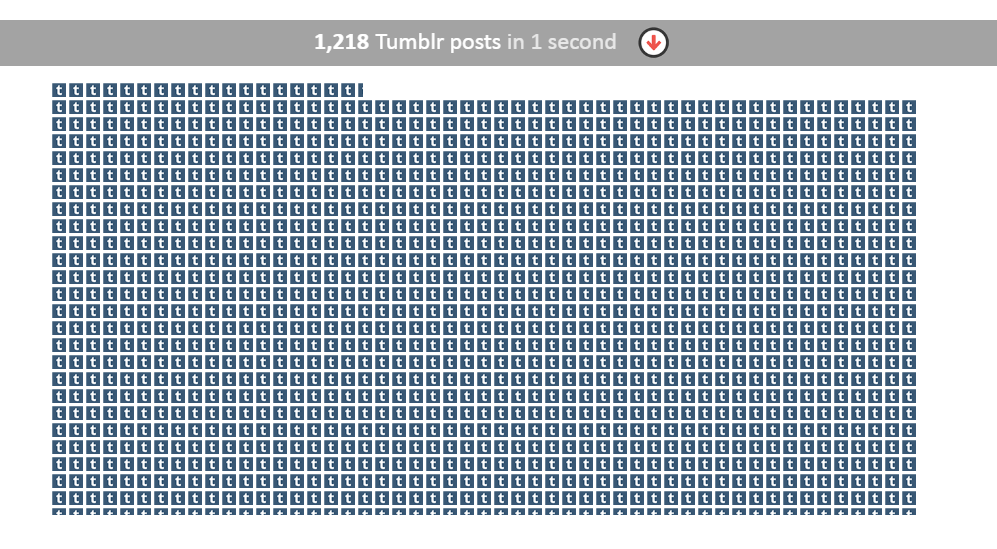 http://www.internetlivestats.com/ 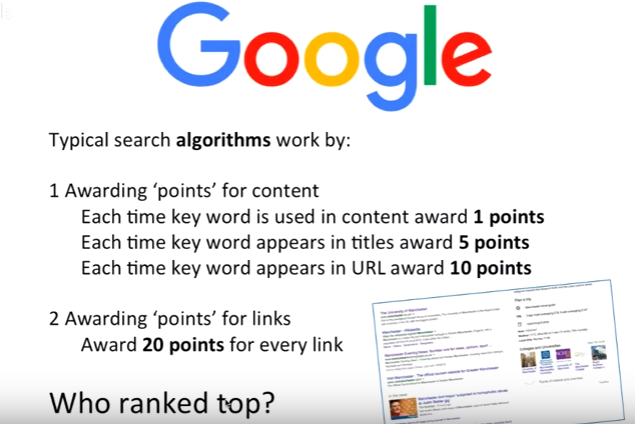 Teaching about Search Engines – Google To allow students to understand how sites are used rank search results Jon suggests creating a class competition. Students are given a particular topic e.g. Manchester. It is then up to the student to design a webpage talking about the content. Following this students score points depending on their website content to decide where their website would be ranked on the search engine. Introduction to HTML A great tool that you can use to look at code for different components of website is via the site Goggles – https://goggles.mozilla.org The site allows you to enter other sites and by clicking on any element you are able to view the coding behind it and also able to edit the text to display what you want to see! This is a great way to introduce coding as students can recognise patterns surrounding areas where text is implemented. Or where photographs are implemented. It is vital that students understand you are not hacking the website – the changes you make will only be visible on their computer. 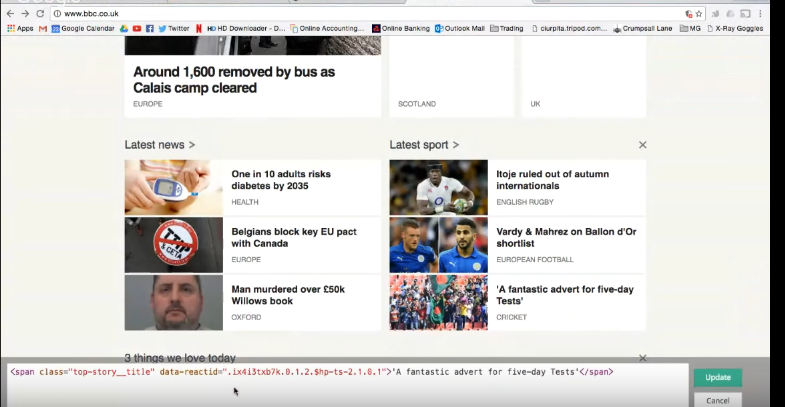 Scratch allows students to learn the basics of coding. It is a platform that allows you to program different animations and interactive games using a set of variable instructions. The user interface is very colourful and attractive for children to use in a step-by-step manner. I had an experiment with Scratch using simple coding to make a cat “Sprite” dance around a playground. 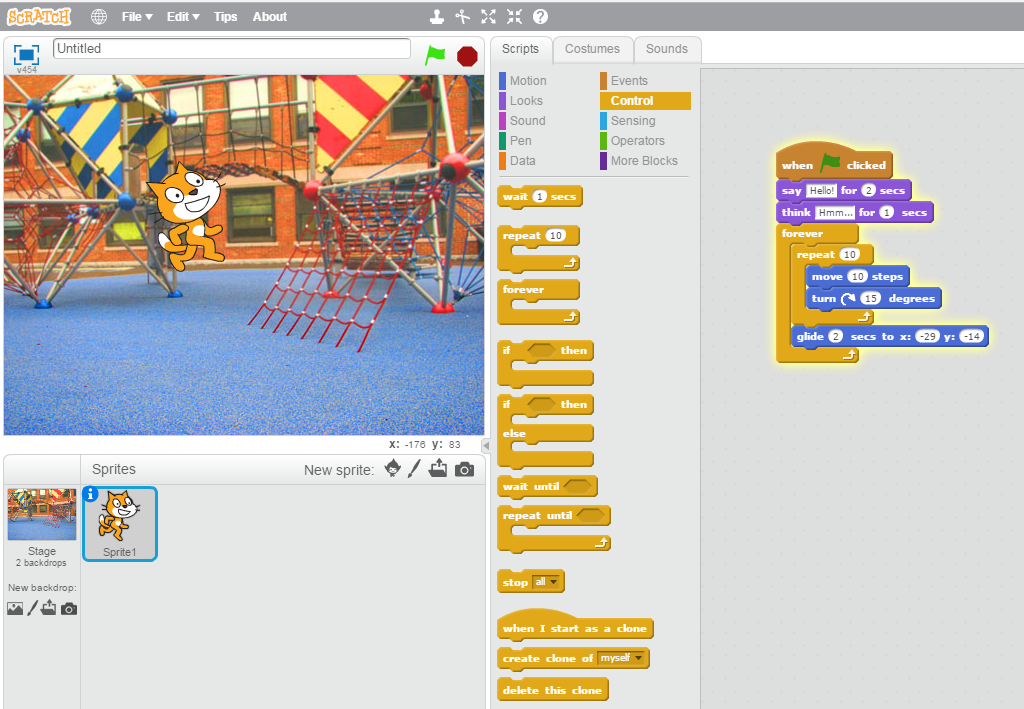 For a little more inspiration on how to introduce the features of Scratch to students, I had a look online for any lesson ideas and came across a couple of lesson plans by Scratch.ie One effective lesson I came across was "Under the Sea" This teaches children how to move sprites around the image and also builds in interactive elements. For example, when the students press “Up” arrow, their fish will move up. When they press “down” arrow the fish will move down. The lesson plan provides further challenges from moving the fish in very simple motions, to creating an aquarium animation with many fish swimming in different directions! A great way to allow children to learn the basics of programming. 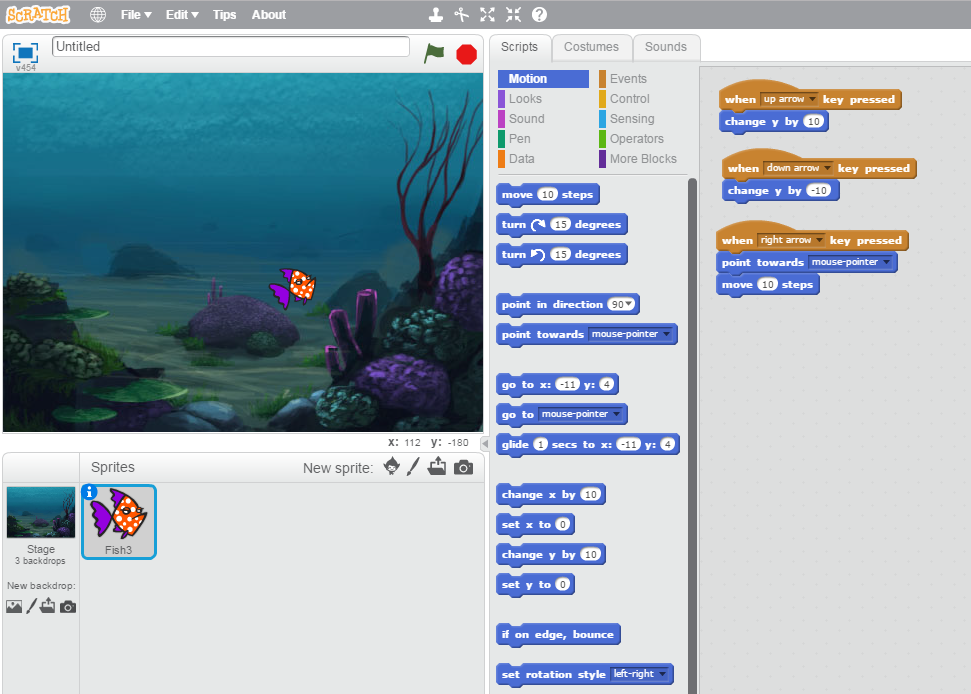 I particularly like the way the Scratch Lesson Plan promotes the idea that children should experiment by changing different settings on the different instructions to see how this affects the animation. This is a great way to learn as it relies on students being curious and learning by doing.
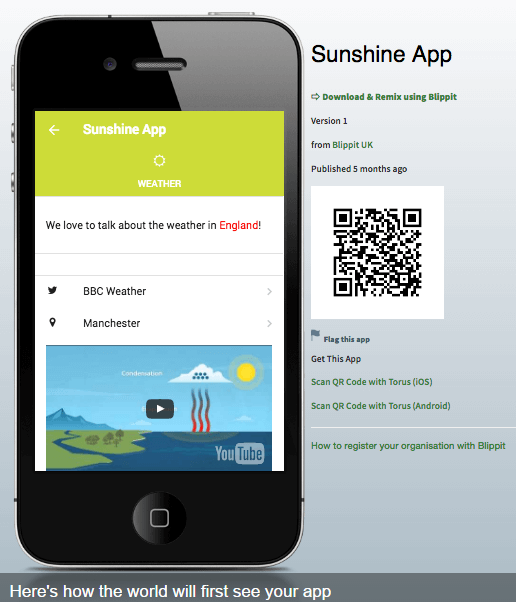
Pitfalls to Scratch Whilst Scratch is very easy to navigate when experimenting, it can become quite complicated when you start to program more ambitious games or animations. It is therefore essential that teachers go at a steady and easy-to-follow pace when introducing Scratch to students or else you may be in danger of turning students off to programming if appears to complex. This is why I particularly enjoyed the lesson sequence describe above as it introduces more challenging concepts once students are familiar with the basics. Youtube is a fantastic online database of millions of videos. I find that a powerful youtube clip can certainly inspire children, whether it is to provide writing stimulus or to encourage curiosity at the beginning of a topic. As an introduction to the Earth and Space I used the below youtube clip. "Our Story in 1 Minute" - whilst this clip has connotations of evolution, there is also reference to the Earth and Moon formation as well as Galileo. The children enjoyed the video and by giving them a couple of minutes to reflect on what they saw, it encouraged the children to become excited about their new topic. In creative writing tasks, I find some children struggle for inspiration. We were learning all about a poem titled "When the Colours Spoke" by Grace Nichols. This poem is all about a painter who is looking at his palette and each colour is trying to persuade the painter to choose them. My lesson was centered around creating similes and metaphors and each child was to write a verse in the style of the poem. However, before setting them off on the task of writing the verse, I played a short video - the Planet Earth trailer which showed a variety of colours in nature as stimulus. The children then discussed which images stood out to them and relayed their partners ideas back to the class. After this 5 minute exercise I found all students were able to think of at least one simile or metaphor and the majority had written a very well thought-out verse! This video could be used as writing stimulus or as part of a series of science lessons on adaptations: I recently downloaded Daisy the Dinosaur onto my iPad. The app is a wonderful app that allows you to learn coding on a simple to use platform. This is fantastic for KS1 learners to introduce them to the idea of coding. The app allows you to select different inputs and as a result Daisy will follow the instructions that you provide. I think this app is fantastic, it is user friendly and very colourful for young children to engage with. Furthermore, it provides different challenge levels that make the coding more and more complex in order to achieve the goal i.e. getting Daisy to the Star. Whilst the app is a great way to introduce the concept of coding, for early KS1 learners some of the language is a little complicated. Whilst the students may be capable of following the instructions, I would imagine younger users would require some adult support to read the challenges before they can implement them. 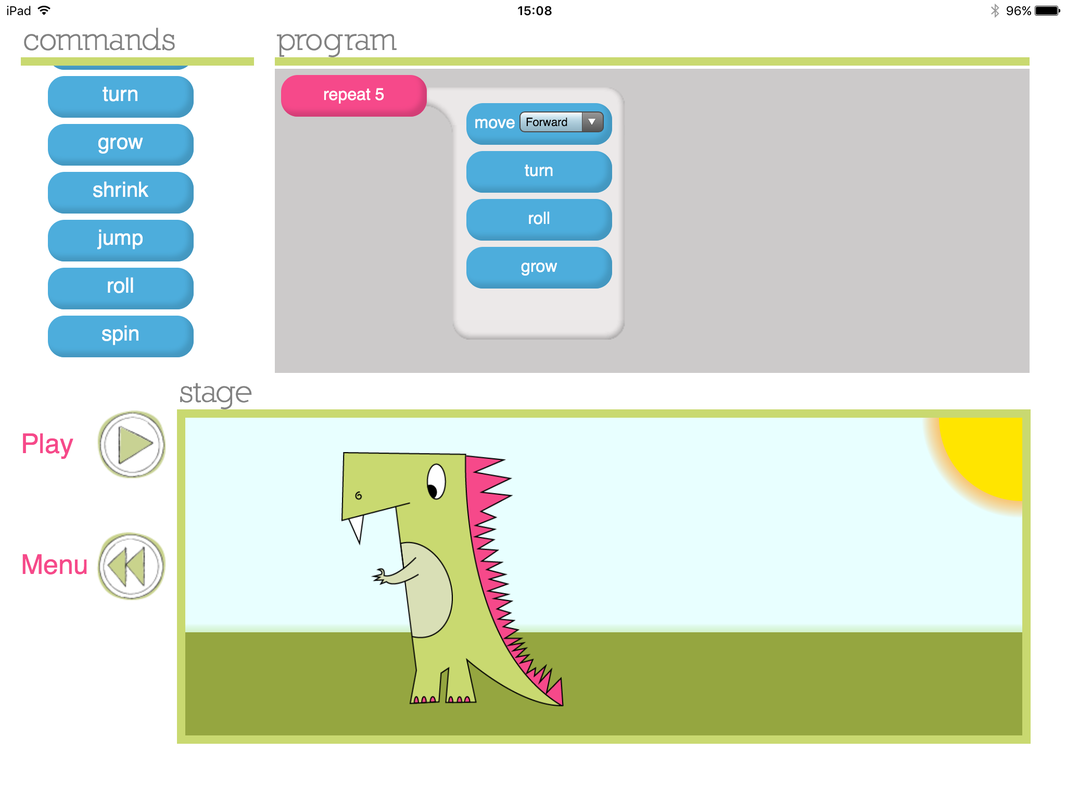 Blippit allows students to make online apps through an umbrella school account. Teachers are able to review and accept or decline the apps with feedback for re-submission. The apps are shared to planet. Students have the freedom to create a multitude of apps and you can tie in links with Digital Literacy though e-safety apps designed by students. It is a very clever way of introducing literacy skills as it can provide a medium through which students can enter explanation and information texts that is more exciting than writing in a leaflet or pamphlet in the classroom. Furthermore, it is allowing students to engage with the developing technology that people interact with every day in the real world. Below are some examples taken from Blippit resources website.
 We are currently enjoying the book Cosmic by Frank Cottrell Boyce. The book is all about Liam, a young boy who looks much older than he really is and as a result gets himself into all types of mischief, not to mention a missions into space! The beginning of the book features a competition to win a trip to Infinity Park - a brand new theme park with a rollercoaster that is 'out of this world' - The Rocket. Our current focus is persuasive writing, particularly the creation of persuasive adverts. I planned a series of lessons in which the children would write an advert and slogan for Infinity Park. They would then pool together their ideas and in groups create a short advert using the iMovie app. The students had one lesson to create a story board for their advert and then had a subsequent lesson to film the advert. Finally we dedicated a computing lesson to editing the videos with sound effects and each group were able to showcase their creations in a celebration event! iMovie was fantastic to edit the videos and I found many of the students were already very familiar with the app! It also has some pre-set adverts which could be useful for students who are less confident with the app or require more of a structured approach.  As part of their computing lessons the students in my class have been learning about stop-animation. Mr O our very talented teaching assistant has been leading the teaching of the computing curriculum at my school and I had the pleasure of helping out in one of his lessons. I Can Animate is an app designed by Kuliand Software and is a simple app that allows you to generate stop-motion animations. Think Wallace and Gromit, still images made from Plasticine but when overlayed and edited together, bring the characters to life through movement. For the history of animation, this website has a lovely summary of how animators have developed their techniques over time https://eoghanswebanimation.wordpress.com/the-history-of-animation/  My class were to create a stop-motion cartoon through drawing. The students would draw their cartoons frame by frame and capture each frame using the I Can Animate app on the iPad.
The app then puts all the images together to create a short animation. The students worked in pairs and given they were able to draw anything they wanted to we had a whole range of different animations! From friends walking in the sunshine, to pacman being chased by ghosts. The students loved the opportunity to couple their creativity and story-telling skills to computing.  As mentioned previously, my class are currently learning about Earth and Space in science. They are enjoying the topic greatly and we have made a beautiful classroom display of the planets, moon and sun on a 2D scale. However, to bring the topic a little bit more to life for them I thought I would take the opportunity to increase my virtual reality skills. I downloaded the Quiver app from the app store with the hope to creating a 3D image of the sun and the moon within the classroom and to display these on the whiteboard using Airplay. Quivervision is a fantastic website with many free resources. Colouring sheets contain special QR and coding prompts that allow the app to recognise your coloured image and manipulate is in virtual reality. One of the colouring sheets called “Dot Day” allows you to colour in a circle and the app then transforms you circle into a moving sphere on your screen. I created images of the sun and the moon and used Quiver to tranfrom the 2D shapes into spherical celestial bodies hovering in our classroom, or at least on the whiteboard! The children were certainly wowed by the outcome and fascinated as to how the app worked. Quiver has a variety of different colouring worksheets, some packs you are required to pay for however often companies such as Ford and Starbucks provide free colouring sheets to promote their business. With a growing demand for mindfulness within the primary setting, schools often encourage children to colour in pictures in “choose or golden time” – why not provide the opportunity to bring those photographs to life with an augmented reality app such as Quiver.  My year 5 class are currently enjoying a module on the Earth and Space. One difficult concept to explain was how the sun looks as though it is moving across the sky however, it is stationary and it is the Earth rotating on its axis that causes this optical illusion.
The school has fantastic resources and all classroom are fitted with apple-compatible smart television thats has the “Airplay” function. When using an iPad I am able to display whatever is being shown on my ipad screen onto the school smart TV. An invaluable tool for demonstrating how to use the iPads but this also extends much further. To illustrate how the Sun is stationary and it is the Earth that is spinning I created a model using the iPad, a yellow ball and the smart tv. The yellow ball was held by a student to represent the Sun. Another student was the Earth and held the iPad with the camera function switched on. I then used airplay to display what the iPad was viewing onto the tv. The student holding the iPad then slowly completed one rotation on the spot to mimic the Earth spinning on its axis. As the student rotated on the spot with the Sun (the yellow ball) in view on the TV screen it looked as though the ball was moving across the screen. However, the students in the class could see that the ball was stationary and actually it was the Earth that was spinning (or the person holding the iPad). After this lesson the students finally understood the concept of day and night!  As part of our science taught course we were introduced to data loggers. These clever little boxes are able to measure light, sound and temperature and can be linked up to your computer to record data in the form of graphs and tables. They are a fantastic tool to allow students to record accurate data and analyse their findings using the graphs that are generated. We made a simple experiment testing whether which material allowed the most light to pass through it using a torch and coloured film. Whilst the data logger did show some variance between the different colours we used, it was difficult to note a significant difference due to the interference from the light in the classroom and natural light. In a school setting however, this would be an interesting topic to explore with your students – how to control the conditions to ensure only the dependent variable is changing. After being inspired in our taught session I went on to research what ideas teachers have carried out with their classes and found a whole range of ideas from the Primary Science Teaching Trust. https://www.pstt-cpd.org.uk/ext/cpd/datalogging/getting_started.php One clever way that they propose introducing the data loggers to the class is to put the logger on record in the classroom for a whole day in secret measuring the noise levels. At the end of the day you can reveal to your class the data you have logged over the course of the day. I could imagine this would really capture students’ intrigue as they work out when break and lunchtime are due to dips in the noise levels, when they entered the classroom etc.   I recently enjoyed a ‘Google Hangout’ session led by our computing lead, Jon. The hangout provided some great examples of practical activities that can be used to teach coding to KS1 students. Computer science has moved on from when I was at school where I learnt basic ICT skills. There is a shift from learning about how to use computer technology to how computer technology itself works. The computing curriculum encourages children to become creative computer developers and through a deep understanding of computer programming. As essential part of computer programming is computational thinking and it is essential that this relationship is reinforced throughout students’ learning. KS1 Curriculum The KS1 curriculum entails many parts of the old ICT structure; i.e. students should be able to recognise common uses of technology beyond school and understand how to use technology safely and respectfully. However, beyond this the curriculum emphasises that students should become creative users of technology e.g. learning how to create and debug simple programs and develop logical reasoning skills to predict the behaviour of simple programs. For KS1 when teaching computing it is important to think about the language that you are using. There are some very complicated words and it is essential that, as a teacher, you are able to translate the concepts into an easy to understand message. For example: Jon describes algorithms as “a sequence of instructions or a set of rules that humans can understand that describe what we want our computers to do.” Computers are logical therefore it is important to introduce logical reasoning skills to KS1 students before they move on to programming. Programming is dependent on good the logical reasoning skills. Jon suggests that it is highly important to carry out unplugged activities with KS1 students before moving onto more sophisticated use of software. Unplugged Activities: Barefoot Computing: Crazy Characters This activity involves asking students to write algorithms to draw crazy characters. Students learn that the instructions must be very specific or else there is room for interpretation and different characters will be created rather than the one they had imagined. Children are able to improve their algorithms until someone else is able to draw what they had imagined! This activity allows children to develop a logical mindset and reinforces how computers are logical and when you program a computer, it is important that you do not leave any room for interpretation and use very specific instructions. To visit the Barefoot Computing Crazy Characters activity page please follow below link: http://barefootcas.org.uk/programme-of-study/understand-algorithms/ks1-crazy-character-algorithms-activity/ Code-It : ‘Jam Sandwich Robot’ This is fantastic way to develop children’s algorithm-writing skills. The teacher becomes a ‘Jam-Sandwich-Making Robot’ – Student must write a specific set of instructions and then the teacher must follow the instructions to make a jam sandwich. I think the children would be highly engaged with this activity. To make it even more immersive for the students perhaps the teacher could make a cardboard robot head to wear as they are making the sandwich! Alternatively, students could make robot heads in DT and then in a sequence of computing lessons wear their robot heads when trying to complete their partner’s algorithms written for different tasks. Below is a video of a teacher acting as the jam-sandwich robot- the students quickly learn that their instructions need to be very specific for the teacher to complete the task! The class love the activity, when the robot is provided with an ambiguous instruction it creates hilarious results! The two activities help students to understand the specifics of algorithms and develop their decomposition skills – i.e. breaking down a complex set of instructions. Implementing Programs on Digital Devices
After students become familiar with the unplugged activities and develop their logical reasoning skills they are ready to implement programs onto digital devices such as floor-bots. One fantastic device to hone their skills is Bee-Bot. For my blogpost on activities using Bee-Bot please see: http://sjhpgceblog.weebly.com/blog/first-encounters-beebot Scratch: allows users to program characters ‘sprites’ by using blocks of code. Blocks of code are dragged into the program area. Daisy the Dinosaur whereby you can enter a series of code which are simple instructions for the dinosaur to complete. I look forward to exploring the above apps in later blog posts!  My action plan highlighted that I had no experience with programming robots such as Bee-bot. My target for this week was to familiarise myself with how to use a Bee-bot and to explore how it could be used in the computing curriculum and also any cross-curricular activities. The Bee-bot is a small robot that allows students to input a series of commands that are then translated into a step-by-step movement sequence allowing the Bee-bot to move from one location to another. It a fantastic tool to introduce fundamental elements of computing such as algorithms and sequencing and can also allow students to build and development a variety of skills such as planning, predicting and teamwork.  Bee-bots have 6 simple function buttons on their back
With a couple of my fellow teacher trainees we set up a simple activity where we would program the Bee-bot to move across a table from one corner to another with the start and the end points clearly labelled by post-it notes. This was a great activity as it meant that as a group we had to predict how many forward commands would allow the Bee-bot to reach our goal. Unsurprisingly it took us a couple of attempts to enter the correct amount allowing us to evaluate and adjust our input sequence. Classroom Activities Using Bee-botFollowing my initial encounter with the Bee-bot, I decided to develop my knowledge further and have a look for any online resources to provide inspiration on how it could be effectively implemented in classroom activities. Barefoot learning provide an excellent lesson plan on how to use the Bee-bot to introduce the idea of algorithms to KS1 learners. This lesson plan can be found here - http://barefootcas.org.uk/wp-content/uploads/2014/09/Bee-Bots-1-2-3-Activity-Barefoot-Computing2.pdf Going beyond computing, the Bee-bot could be effectively implemented as a cross-curricular learning tool to engage students via a different medium. I have enjoyed watching several YouTube videos on lesson activity ideas. One particular example is listed below: Geography – Co-ordinates and Maps https://www.youtube.com/watch?v=t-cuvpbcErI I thought this was a great example of thinking outside the box! Using a large global or regional floor map with coordinates each student would place their Bee-bot on a different country/landmark (coordinate). It was then a race to in which students then had to program their Bee-bot to reach the destination, (e.g. from Hungary to Poland). I loved that students could implement a variety of cross-curricular skills for this activity. They would develop their knowledge of programming to input instructions into the Bee-bot; use coordinate and mapping skills to plan how to navigate the Bee-bot from one area on the map to the destination and reinforce geographical awareness of where countries are on the map and also the relative distance between countries. Other examples of cross-curricular activites - Early Numeracy and Counting –Bee-bot plays Snakes and Ladders https://www.youtube.com/watch?v=CoOc37uQ4Cw Spellings – Beebot is used to spell words using a floor mat with letters https://www.youtube.com/watch?v=NXM8hVAuP-I  With many schools now investing in iPads as a classroom resource it is worth noting there is a free Bee-bot app. Perhaps this may allow for wider engagement within the classroom as it could prove as a useful tool to introduce stretch objectives for students who grasp the concept of inputting the sequence and want to develop their skills further.
After physically programming the Bee-bot myself and looking into ideas for classroom activities, I feel confident that I could implement it effectively in my future lessons. I look forward to further exploring the uses of this clever little educational robot once I am in the classroom!  During one of our recent Science seminars we were able to Skype a local school to observe a live science lesson in action! Using the interactive whiteboard and two laptops with webcams and microphones we were able to listen to and watch an entire lesson.
This experience was invaluable as not only did we have the opportunity to witness a well planned lesson and a teacher in action reacting and adapting the lesson in real-time - it also demonstrated the power of the internet and the benefits that technology can bring to the classroom. Skype has created opportunity to engage in a variety of scenarios that would not ordinarily be possible. Imagine trying to recreate this lesson without Skype! 40 PGCE students wedged around the periphery of the classroom whilst the teacher attempts to maintain the attention and focus of his/her 30 students. It would be a health and safety nightmare and simply too intrusive for the observed lesson to truly represent what an every day science lesson looks like. Thanks to Skype the teacher was able to mute our call when we were not interacting with the class and so his students could focus on the work uninterrupted. As a result we were able to witness real behaviour management, assessment for learning and rich questioning! It also meant that for the class of KS2 students managed to get a glimpse into the classroom of post-graduate students and interact with one-to-one questioning opportunities! The world is a much smaller place with Skype and schools should take advantage of the opportunities it could allow! Many schools now have 'sister schools' across the globe - Skype would provide a fantastic way to contact the school and allow children to interact with other schools, whether they are from the local area, other parts of the country or on the other side of the world! |
AuthorSophie Archives
March 2017
Categories |

 RSS Feed
